Carabiner Buying Guide
Yikes! We’re not done with this post yet.
It’s a work in progress. Stay Tuned as we work to update it and thank you for your patience!!!
The second most ubiquitous piece of climbing gear is the carabiner.
analogy of one carabiner to rule them all versus niche carabiners… like do you want something to work perfectly, or one thing to do most things well?
As you read this guide, reflect if you’re the person who wants everything to work absolutely perfectly at all times, or if you favor efficiency and saving money over perfectness.
THE CARABINER
Knowing these core terms will help clarify our recommendations. They’re not necessary to memorize, but we do casually use the terms _____, _____ and _____ from this point forward.
CARABINER_IMAGE
Nose
copycopycopycopycopycopycopycopycopycopycopycopycopycopycopycopycopycopycopycopycopycopycopycopycopycopycopycopycopycopycopy
Body
copycopycopycopycopycopycopycopycopycopycopycopycopycopycopycopycopycopycopycopycopycopycopycopycopycopycopycopycopycopycopy
Gate
copycopycopycopycopycopycopycopycopycopycopycopycopycopycopycopycopycopycopycopycopycopycopycopycopycopycopycopycopycopycopy
Other
copycopycopycopycopycopycopycopycopycopycopycopycopycopycopycopycopycopycopycopycopycopycopycopycopycopycopycopycopycopycopy
CARABINERS – To Lock or Not to Lock
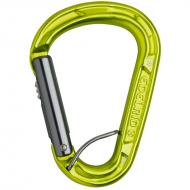
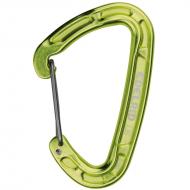
Non-Locking Carabiners

Details
- cannot be “locked shut”
- most of your carabiners will be non-locking
- lighter and cheaper than locking carabiners
- can be solid gate or wire gate
Common Uses
carabiners on quickdraws and alpine slings
PHOTO
ANCHORS – When there is redundancy like connecting two bolts on a top rope setup
PHOTO
Trad Anchors – Connecting pieces of pro to an anchor
Racking Gear on your harness, like cams, nuts
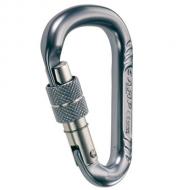
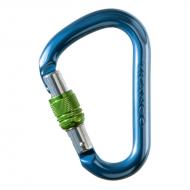
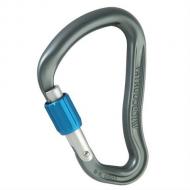
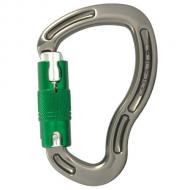
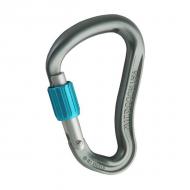
Locking Carabiners
PHOTO OF LOCKER
Details
Locking carabiners are required to belay, rappel, and when you tie into an anchor. Most climbers carry 1-4 locking carabiners on their harness. For indoor use, you only need one locking carabiner to use for belaying.
For safety, you can also use locking carabiners anytime the carabiner is touching the rock in a way that it could rub the gate open and it would be tragic if the gate opened.
Common Uses
belay carabiner
PHOTO
ANCHORS – anchor master/power point (trad/sport/top rope)
PHOTO
clove hitch into an anchor
locker on autoblock
Note: You can use a locker at any time when you want an additional level of safety. If you’re setting up a top rope anchor and have the time and means to use all locking carabiners, that is absolutely fine.
It is not common to use lockers on quickdraws, but it is totally reasonable to use a locker for the first bolt, a low crux, a sketchy area, or a traverse that angles strangely. This is also part of the reason that climbing companies created products like the Edelrid Pure Slider, Grivel Twin Gate series, Kong Frog / Ergo / Panic and Mad Rock Trigger Wire.
Locking Carabiner Options
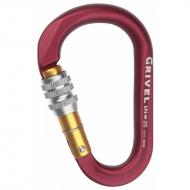
Screw Gate Locking Carabiner
PHOTO DETAILS
Details
- to open/close you manually screw the gate
- most common locking type
- lighter and cheaper than auto-locking carabiners
Possible Cons
- There is a [small] chance that the gate can accidentally open from rubbing against something (rock, harness, rope, etc)
- Since the operation is a manual screw, it may take longer to open/close than auto-lockers.
Auto-Locking Carabiner
PHOTO
Details
- fastest way to lock a carabiner (it automatically locks when you let go)
- less likely to open due to rubbing
Possible Cons
- Other than the expense and weight increases, the biggest argument against auto-locking carabiners is that they “turn climbers lazy.” The premise is that climbers will stop checking to make sure the gate is locked since it “always” seems to lock. Then when the auto-locker fails (perhaps it gets dirt in the mechanism) the climber isn’t checking. Or the climber forgets they’re useing a screw gate and no longer tests the gate to ensure it’s locked.
To learn more about the newer Auto-locking carabiners, that close with magnets and sliders and other creative methods, check out this post:
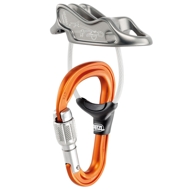
BELAY CARABINERS
Belay carabiner are always locking carabiners, whether they’re screw gate or auto-locking (see above).
We’ll get into shapes details more below, but most often belay carabiners will be in a Pear or HMS shape. This gives the widest rope bearing surface and allows for the smoothest rappels.
PICTURE
Belay Carabiner Features
None of these are required, but if you want assistance narrowing down the choices, these are some features you could check for.
A round top. This provides a smooth surface for the rope to roll over. The whole carabiner doesn’t need to be circular, but the more rounded the rope-bearing surface, the less friction there will be. Note: If the spine is an I-beam shape, it will be lighter weight.
A belay loop keeper. The biggest danger of belay carabiners is their potential to become cross-loaded while belaying. This keeper ensure the carabiner will always be orientated in the strongest position. Note: Some climbers find this feature annoying, others find it worth the additional safety.


Rotation Stopper. A mechanism or increase in size that keeps the belay device oriented in the best direction. Many of these devices were designed specifically to stop the rotation of belay devices like the GriGri.


A bottom shape that suits the belay loop. It is rare to find this, but the more square-ish the bottom of the carabiner, the better it will sit in the belay loop.


SHAPE
Full Body Shapes
Most carabiner shapes come in locking or non-locking and wire or solid gates. Each carabiner excels in different areas; the most common wire/solid gate shape is Offset D. The most common locker shape for belaying is Pear/HMS. For other lockers it’s Offset D’s, to save weight.
Offset D

Pros
- most common shape, it’s easy to find
- largest gate opening providing the easiest clipping
- high strength-to-weight ratio
- stronger than most other carabiner shapes (with weight directed to the spine)
- lightest option (thanks in part to the narrow bottom)
- narrow end holds slings well (like for quickdraws)
Cons
- generally more expensive than other shapes (more complicated to design/forge)
- not as strong as standard D-shaped carabiners (D’s allow even more weight to be transferred to the spine)
Best Uses
Top and bottom of the quickdraw
offset D’s more easily maintain the correct orientation on a quickdraw
PICTURE
Clipping into bolts or gear for multi-point anchors
PICTURE
Racking gear on your harness
Benefits: low weight and low volume
PICTURE
D

Pros
- strongest shape
- larger gate opening than ovals
- lighter and stronger than ovals and Pear/HMS shapes
Cons
- slightly more expensive than ovals
- smaller gate opening than Offset D’s
- heavier than Offset D’s
Best Uses
1 good for crevasse rescue / pulley systems
anchor power points (piece of mind with maximum strength)
PICTURE
2 best shape (like oval) to tie a Bachmann knot (thanks to the straight back)
PICTURE
3 second best style for carabiner brake rappels (definitely not a commonly used method to rappel, but the almost symmetric shape is key)
PICTURE
PEAR / HMS
Pros
- large gate opening (easy to clip into)
- lots of room for clipping multiple items (ropes, knots, slings, etc)
- often have rounded rope-bearing surface for smooth belays and reducing rope wear
Cons
- less strong than D’s/Offset D’s
- heavier than most other shapes
- price range starts higher as they use more material
Best Uses
Belaying
wide top reduces rope binding especially during rappel, larger rope-bearing cross section for smoother belaying and less kinking
PICTURE
Anchor Power Points
larger size allows for easier organization
PICTURE
3 ???
PICTURE
OVAL

Pros
- flips/rotates easily when unweighted, minimal movement while weighted
- inexpensive
Cons
- weaker than other shapes
- smaller gate opening than most shapes
- heavier than most shapes
Best Uses
racking your nuts (nuts spin around the curves easily, no catching points)
PICTURE
aid climbing (reduces shifting under load due to the symmetry), and/or holding a pulley (the pulley will sit smoothly at the end)
PICTURE
- best shape for a carabiner brake rappel system (not commonly used, but the symmetric shape is key)
- best shape to tie a Bachmann knot (since it has a straight back)
PICTURE
3D

There are very few 3D carabiner models that don’t include a swivel attachment. The point of this 3D design is to increase the gate opening of locking carabiners and to reduce the chance that the rock will rub your rope and/or the locking gate open.
Buy one if you’re the curious type and have money to burn. They’re not cheap, and there’s not many in the US.
Semi-Circle

Not usually used directly for climbing. Most often used on chest harnesses and rope clamps. They balance the load equally, and they’re always locking.
Buy if you need to secure a chest harness (where you would end up cross-loading any “normal” shaped carabiner).
Oval Mallions
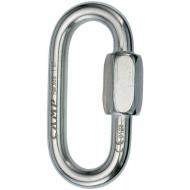
This is not a common piece of gear to own. The only reason we list it in the carabiner section is because the UIAA certifies it as a carabiner. It’s made of stainless steel and closes (securely) with a wrench. It’s ideal for fixed draws or rappel stations.
Buy if you want to make some fixed draws, or connect a bunch of crappy slings together to have a safer point to rappel from. This would also make the rappel so you’re not rubbing rope on rope (similar to the goal of a rappel ring, except this mallion is easier to add after the fact).
Note: Non-Climbing brands make these types of links as well, if you’re buying from a non-climbing brand, ensure it is certified EN12275.
Read more details about carabiner shapes in this post:
ROUND STOCK VS I-BEAM
You’ll notice each carabiners cross section is also very different.
In the last 5 years, the amount of completely round-stock carabiners has dropped drastically. Now, most carabiners now have at least slight cut-outs to reduce weight, and also to create more eye-catching designs.
Round stock

Not quite round, but no distinct I-beam shape either

Mix of round stock and I-beam
I-beam, very shapely with lots of cut-outs
How do you decide?
The biggest reason for I-beam designs with shapely cut-outs is to save weight. Sometimes this means the strength will decrease as there is literally less metal. Other times, the strength will be nearly equal thanks to smart engineering deciding which area’s of metal can be removed without reducing strength. Manufactures spend a lot of time designing for the “best” strength to weight ratios.
The only time it is particularly beneficial to have a round (or more round) carabiner, is while belaying and rappelling. The wider and rounder the top of the carabiner is, the less friction the ropes will have.
Since I-beams are more complicated to make, they also cost more. So generally the balance is around weight, price and strength.
Going Further
The most intricate carabiners are made via a hot forging process, which involves heating the metal to make it more malleable. This heating process is time consuming and requires more machinery so it is also usually a more expensive process. But, it can also be the only process that can create such elaborate carabiner shapes.
This is an example of the manufacturing steps of a hot-forged carabiner:
Traditionally, carabiners were made via cold-forging which requires a machine for bending and then stamped into a mold to form the exact shape. Often this carabiner is still heat treated to strengthen the structure, but not to the degree that the aluminum is heated for hot-forging. Click to see an [old] video from Black Diamond that demonstrates the cold forging process.
SIZE
The size of carabiners varies dramatically as well. Generally size is thought of as “full size” or “mini” and now even “micro.” Unfortunately there is no official definition of a “full size” carabiner and the other names aren’t official either.
This is an example of two carabiners that are almost identical in shape but vary in the size.

Pros of a full size (aka large) carabiner
- fit big hands better
- fit with gloves better
- they are often stronger (not always!)
Used most often by
- sport climbers
- gloved climbers
Pros of smaller carabiners
- they weigh significantly less
- they can take up less room on your harness
Used more often by
- alpine climbers, saving weight on the approach
- trad climbers, saving weight & space on the climb
Just because a carabiner is bigger, does not always mean it will be small either. Here is an example of the lightest carabiners and how much their size can differ.

How to pick the best size carabiner
There is no size that will fit every climber best. To find the size that works best takes experimentation.
The fastest way to find the best size is to try out as many carabiners as you can from different brands. See how they fit in your hand. The size of the carabiner may change your clipping techniques. For example, the smallest carabiners will only allow one finger on the gate to open, while many larger carabiners will allow two.
Most climbers will notice they have to handle mini/micro carabiners in a fairly specific way. One question is, how intuitive is that handling for you? When you grab this carabiner off your harness, will you be able to grab it in the correct position every time? If you don’t grab it in the correct position, will it be annoying?
There will be a larger learning curve to get used to small carabiners, versus ones on the medium/large side. And, even with practice, some climbers can’t stand the mini/micro carabiners. That’s fine. It’s all personal preference.
When you’re testing carabiners in person, these differences may affect how the size feels as well
- height of the back of the carabiner
- the angle of the back of the carabiner
- the stiffness of the gate
- the length of the gate / gate opening
Sizing Tips
Top rope climbers main use for more carabiners is for setting up anchors. You’ll want a carabiner that is small enough to fit through bolts and chains but large enough that it’s easy to use and has less potential of dropping.
Most sport climbers pick full size carabiners because their priority is easy clipping. You don’t have a lot of gear on your harness so the weight doesn’t matter as much.
Trad climbers who have a lot of gear on their harness may like smaller carabiners, particularly for <<<<<racking their cams and nuts>>>>> because they take up less room and weight.
If you sport and trad climb and want to save money as you switch between disciplines, you could buy smaller carabiners for racking your gear and larger carabiners for your quickdraws.
Alpine climbers may prefer smaller carabiners to save weight on long approaches.
Ice Climbers are in the trickiest spot, because they need to carefully balance how easy a carabiner is to clip with gloves and how much weight is added.
SOLID/WIRE GATE CARABINERS
| solid_gate_photo | Solid Gate
|
| wire_gate_photo | Wire Gate
|
*gate flutter (aka gate lash): a very rare occurance when the carabiner experiences irregular forces and the gate momentarily opens. You’ll see “open gate strength” listed on all carabiners
Learn More
STRAIGHT / BENT GATE CARABINERS
All locking carabiners have straight gates. Non-locking carabiners (both wire and solid gates) can have straight or bent gates. There’s no price, weight, or strength difference between straight and bent gates. Both types may come with a keylock nose.
| straight_gate | Straight Gate
|
| bent_gate | Bent Gate
|
*Bent gate carabiners main use is for the bottom of the quickdraw because it makes clipping the rope easier. It’s also nice to have a bent gate to distinguish the rope-end of the quickdraw. This is important because the top carabiner that touches bolts may get micro-cuts/burrs in the metal (enhanced by falls) that can have surprisingly dangerous results (https://goo.gl/6tpVw) of cutting the rope. It’s important to be consistant in which carabiner is used for protection and rope side of the quickdraw.
**Usually the quickdraw dogbone (material connecting the carabiners) is fixed in place (by tigher sewing or a rubber stopper) on the rope-end. If the fixed side is used on the bolt (and not the rope), and the quickdraw is loaded, the sling could contort the carabiner and result in cross-loaded forces.
QUICKDRAW CARABINERS
Top straight, bottom bent
color coding
why it’s good to keep them separate
COLOR-CODING
quickdraw for bolt and rope side
ok to pick color based on preference
RACKING CARABINERS & RACK PACKS
What are racking carabiners?
Simply put, a racking carabiner is any carabiner used to keep gear on your harness. They are most necessary while trad climbing as a way to hold all the cams and nuts on your harness or gear sling. Technically, racking carabiners can be any carabiner you have – they become a racking carabiner when they start holding, or “racking” your gear. Traditionally all gear was racked using whatever standard carabiners were available. Racking carabiners available today are used because they are generally small, lightweight and come in a variety colors, enabling easy identification of the size/color of your protection

Who benefits from racking carabiners?
Trad climbers, ice climbers, alpine climbers, basically any climber that is taking a “rack” of gear with them.
In addition to coming in every color, racking carabiners also come in all shapes and sizes.

Why rack with colored carabiners?
Pros
- Easier to quickly glance down and see what cams you have left
- Help ensure you’re grabbing the size you want, especially if time wasn’t taken at the belay to rack in order
Cons
- Encourages you to buy more carabiners (to replace all the boring silver ones)
- Rack packs don’t account for doubles – so you may need to purchase colors individually
Learn more about racking carabiners (how to rack, when you can rack, along with our tips of the best racking carabiners
KEYLOCK NOSE CARABINERS

Keylock Benefit: The lack of a hooked nose means there is significantly less snagging on other gear or bolts – a dramatic improvement.
Keylock Drawback: Given that they’re more complicated to manufacture, keylock designs often come at a higher price.
| keylock | Keylock (Notchless) Nose
|
| notched | Notched Nose
|
NOSE ANGLE
A keylock nose itself does not ensure snag-free clipping. The severity of the nose angle has a significant impact on whether it will catch, particularly while clipping bolts. The more continuous and smooth the curve of the basket-to-nose interface, the less catching and ultimately the easier the carabiner is to clip and unclip.

The smoother the curve and flatter the arc, the lower the snag potential.
If you want to read more about keylock carabiners, geek out on carabiner noses, learn about carabiner nose shrouding and compare notch styles check out this post:
GATE OPENINGS

The larger the gate opening the more rope/webbing/gear you can clip into it. It is also associated with easier clipping.
Although it’s tempting to assume that a large gate opening is better, gate opening alone does not guarantee a superior carabiner. A larger gate opening signifies the potential for the carabiner to be easier to clip and hold a lot of gear, but this could easily be thwarted by the angle of the nose, the width of the basket, or the usability of the gate (i.e. ease to hold open, how your finger(s) fit).
What is the best gate opening?
Good question. It’s impossible to choose the best carabiner based on gate opening only. The answer will change depending on how you’ll use the carabiner. What matters most is how many items (and the size of items) you want to easily fit into the carabiner.
You can see graphs and more geeky data on our post that covers weight vs gate openings.
general guidelines
top of your quickdraw a straight gate is the standard here, and 17 mm – 22 mm is great
bottom of your quickdraw pick a bent gate that has a 23 mm – 26 mm gate opening
an anchor carabiner that needs to hold multiple pieces of gear/webbing: 19 mm+
The combination of gate opening and basket size are the two most significant factors when determining how much gear you can effectively get into a carabiner.
The relationship between basket size and gate opening also impact the technique required to clip the carabiner. If the basket and gate opening are too small, it may not be possible to clip with a full finger(s) in the basket because your fingers will get in the way of the rope sliding into the carabiner.

Gate opening is less important than how the carabiner feels in your hand and how you can operate the carabiner in a clipping situation. This is because the body shape, nose design, and shape of the basket can completely change the feel and usability.
That being said, you will want a larger gate opening if you want to use the carabiner to hold lots of webbing or rope, such as in an anchor situation. For anchors, a small gate opening can slow you down and become a source of intense frustration if your systems aren’t highly refined. Clearance is king.
Adding bias towards a larger gate opening is a fantastic option once you’ve narrowed down your choice to a few similar carabiners and need to determine which one is the best.
STRENGTH OF THE CARABINER
To ensure your new carabiner is strong enough to use rock climbing, make sure it is CE and/or UIAA certified from a known climbing manufacturer. That’s literally all you have to do to ensure your carabiner is strong enough to climb on.
Learn More
Strength to Weight to Gate Opening Ratio
Offset D’s strike the best balance between gate opening, weight and strength. This is quite a stark contrast compared the traditional shapes, like ovals, that are weaker and have a smaller gate opening.
Get more details of all the other shapes and see graphs in this Strength to Weight Carabiner Post.
WEIGHT OF CARABINERS
Carabiner weight varies from 19g to over 100g (the latter being steel). Wiregate carabiners range from 19g to about 50g and are by far the lightest available. Solid gate carabiners are the next lightest and range from 31g to about 80g. Lockers are even heavier, ranging from $7.50 to $26. It’s worth noting that screw gate lockers are significantly lighter than auto-locking carabiners.
| 1_feather_or_ton | under 35 grams
|
| 2_feather | 35 g – 42 g
|
| 3_feather | 43 g – 72 g
|
| 4_feather | 108 grams and above
|
PRICE OF CARABINERS
The price of carabiners varies dramatically. Generally, the lower the price the heavier the carabiner (excluding steel, which is much heavier and much more expensive). Nice to have options like keylock carabiners are also more expensive. Lockers are also pricier than non-locking.
| $ | $5 – $8
|
| $$ | $8 – $12
|
| $$$ | $12 – $16
|
| $$$$ | $16 and above
|
HOW TO CLEAN CARABINERS
How to Clean your Carabiner
Soak and scrub/brush the carabiner in hot soapy water.
Dry it
For a thorough job, you can burst some compressed air in the holes to remove any remaining particles. Or you can wait for it to dry, which will take at least an hour.
Lubricate the gate/rivet/spring/lock area, making sure to wipe off any excessive lube.
For more tips like how often to clean, how to inspect, and which lubricants to use check out this post:
https://blog.weighmyrack.com/when-how-and-why-to-clean-and-maintain-carabiners/